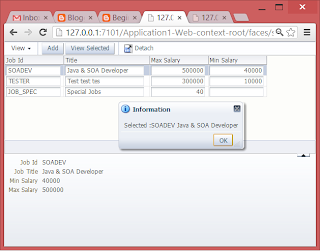
In this post, I will describe how to work with simple tables without a binding layer in Oracle ADF Faces 11g RC.

Summary:

Summary:
- Create a backing bean
- Drop a <af:table/> component to the page
- How to add new row
- Managed row selection
- Handling selection events
Create a backing bean
//package and import statements
public class SimpleTableForm {
    private List<Job> jobList;
    private RichTable jobTable;
    private RichPanelGroupLayout panelGroup1;

    public void setJobList(List<Job> jobList) {
        this.jobList = jobList;
    }

    public List<Job> getJobList() {
        if (jobList == null) {
            jobList = new ArrayList<Job>();
        }
        return jobList;
    }
//other codes
Drop a <af:table/> component to the page
When you drag and drop a table from the component palette, the "Create ADF Table" wizard will show. I highly recommend that you specify the Element Type so that JDeveloper will auto populate the corresponding columns for you.How to add new row
To add a new row you just have to add a new item into the corresponding List that holds your data as in the following example://adds new row
public void addJob(ActionEvent actionEvent) {
Job job = new Job();
getJobList().add(job);
}
You need to set partial triggers to see the newly added row in the table.<af:panelCollection id="pc1">
<f:facet name="toolbar">
<af:toolbar id="t2">
<af:commandToolbarButton text="Add" id="ctb1"
actionListener="#{viewScope.simpleTableForm.addJob}"/>
</af:toolbar>
</f:facet>
<af:table value="#{viewScope.simpleTableForm.jobList}" var="row"
rowBandingInterval="0" id="t1"
binding="#{viewScope.simpleTableForm.jobTable}"
rowSelection="single"
selectionListener="#{viewScope.simpleTableForm.tableRowSelected}"
partialTriggers="::ctb1">
Managed row selection
To get hold of the selected row, you have two options:- Create an attribute selectedJob and update this value in a selectionListener. This seems better to avoid problems related to serialization of JSF components on scopes higher than request, but I prefer the next option.
- Bind the table component to the backing bean. Sometimes you need to manage the current selection on the table component, perhaps to make the newly added row as the current row. The serialization issue can be resolve through the use of "org.apache.myfaces.trinidad.util.ComponentReference" class.
Code below shows a table component bind in the backing bean using a ComponentReference:
private ComponentReference<RichTable> jobTable;

    public void setJobTable(RichTable jobTable) {
        if(this.jobTable == null){
            this.jobTable = ComponentReference.newUIComponentReference(jobTable);
        }
    }

    public RichTable getJobTable() {
        return jobTable == null? null: jobTable.getComponent();
    }
Below is an updated code to make the newly added row as currently selected.
public void addJob(ActionEvent actionEvent) {
        Job job = new Job();
        getJobList().add(job);
        RichTable table = getJobTable();
        RowKeySet selection = table.getSelectedRowKeys();
        selection.clear();
        selection.add(getJobList().size() - 1);
    }
View selected row...
public Job getSelectedJob() {
        RichTable table = getJobTable();
        if (table.getEstimatedRowCount() > 0) {
            return (Job)getJobTable().getSelectedRowData();
        }
        return null;
    }

    public void viewSelected(ActionEvent actionEvent) {
        Job selected = getSelectedJob();
        String msg = null;
        if (selected != null) {
            msg = "Selected :" + selected.getJobId() + " " + selected.getJobTitle();
        } else {
            msg = "No selection.";
        }
        FacesMessage fm =
            new FacesMessage(FacesMessage.SEVERITY_INFO, msg, "");
        FacesContext.getCurrentInstance().addMessage(null, fm);
    }
Handling selection events
Simple tables based on ordinary list object does not throw selection events which you can use as partial triggers. In order to update some part of the page in response to a user selection, you need to add a selection listener and addPartialTarget the corresponding component from there as in the following example:public void tableRowSelected(SelectionEvent selectionEvent) {
AdfFacesContext.getCurrentInstance().addPartialTarget(getPanelGroup1());
}


Excellent post. This helped me big time. Thanks. 32U
ReplyDeleteHi Rommel,
ReplyDeleteIts really awesome post but you missed to post Job class, check and update your post.
Maroof