Showing posts with label ADF Faces RC. Show all posts

Tuesday, May 17, 2011

ADF Faces Layout Tips: Stretching an af:region inside af:dialog/popup component

The original solution to this post has been deprecated. Please see at bottom the proper solution.

I have a hard time stretching the height of an af:region inside a pop-up dialog, so to make the life of others easy, below is a sample to show what I have figured out.

<af:popup id="p1">
          <af:dialog id="d2" type="ok" resize="on" contentWidth="600"
                     contentHeight="400">
            <af:panelStretchLayout id="psl1"
                                   inlineStyle="height:inherit;"
                                   styleClass="AFStretchWidth">
              <f:facet name="center">
                <af:region value="#{bindings.sampletaskflow1.regionModel}"
                           id="r1"/>
              </f:facet>
            </af:panelStretchLayout>
          </af:dialog>
        </af:popup>
The trick is setting the 'inlineStyle' of the surrounding panelStretchLayout to 'height:inherit;'.

Cheers,
pino

Important update to this post:

To stretch a component inside a pop-up dialog you just need to set the ADF dialog's "stretchChildren" property to "first" as described by the following example:
  <af:popup id="p2">
      <af:dialog id="d3" type="ok"
                 resize="on" contentWidth="800" contentHeight="500"
                 stretchChildren="first">
           <af:region value="#{bindings.sampletaskflow1.regionModel}"
                      id="r3"/>
      </af:dialog>
  </af:popup>


Sunday, November 7, 2010

ADF Faces RC: Resolving javax.faces.model.NoRowAvailableException thrown by <af:tree> Component

Caused by: javax.faces.model.NoRowAvailableException
 at javax.faces.model.ListDataModel.getRowData(ListDataModel.java:150)
 at org.apache.myfaces.trinidad.model.SortableModel.getRowData(SortableModel.java:67)
 at org.apache.myfaces.trinidad.model.ChildPropertyTreeModel.getRowData(ChildPropertyTreeModel.java:207)
 at org.apache.myfaces.trinidad.model.ChildPropertyTreeModel.isContainer(ChildPropertyTreeModel.java:219)
 at org.apache.myfaces.trinidad.model.TreeModel.isContainerEmpty(TreeModel.java:153)
I have an <af:tree> component which is bound to a tree model that I create programmatically as illustrated in a previous post. The tree component throws the above described error whenever the tree model changes after making disclosure on some nodes. I thought setting the rendered attribute to false whenever the estimatedRowCount is less than 1 would solve the issue, but it did not. Further search made me found the forum post described below that actually resolve the issue.
The solution is to clear the disclosed row keys of the RichTree component whenever there will be changes on the tree model.
    if (richTree != null && richTree.getDisclosedRowKeys()!=null ){
        richTree.getDisclosedRowKeys().clear();//to resolve NoRowAvailableException
    }
Kodus to the collaborators of the following post: http://forums.oracle.com/forums/thread.jspa?messageID=5394433

Cheers!

Wednesday, October 27, 2010

ADF Region as Source of Partial Trigger

In my previous post, I describe a way on how to expose the state represented by the pageFlowScope object of a bounded task flow (BTF) to the outside world. Now, if there's an event inside the BTF that changes it exposed state, then the dependent outside component needs to refresh as well, and the idea is for it to have a partialTriggers property that point to the region where the BTF resides.

The problem is, the events that changes the state of the task flow are actually coming from the command button components and not the region. To have a hook on these events, then you need have to combine the relative Id of the region and the Id of the command button relative to the containing region like "r1:ctb1". Below is a code snippet from sample app on my previous post.

      <af:form id="f1">
        <af:panelStretchLayout id="psl1" topHeight="50px">
          <f:facet name="center">
            <af:region value="#{bindings.samplestatefulbtftaskflow1.regionModel}"
                       id="r1"/>
          </f:facet>
          <f:facet name="top">
            <af:panelGroupLayout id="pgl1" layout="horizontal">
              <af:toolbar id="t1">
                <af:commandToolbarButton text="Approve" id="ctb1"
                                         partialTriggers="r1:ctb1 r1:ctb2 r1:ctb3"
                                         disabled="#{sessionScope.region1StateHolder['editMode'] eq 'true'}"
                                         actionListener="#{viewScope.mainForm.approve}"/>
              </af:toolbar>
              <af:outputText value="This toolbar button disables and enables depending on the ('editMode') state of the bounded task flow below:" id="ot1"/>
            </af:panelGroupLayout>
          </f:facet>
        </af:panelStretchLayout>
      </af:form>
But in the case of a dynamic region wherein you have no idea of the Ids of the contained command button components then the solution above cannot apply.

We need to step back a little bit and rethink the solution we have above. Since we cannot reference the Ids of the components which we don't have idea about for in the case of a dynamic region, then we should only have a hook on the region itself like "r1". We are left with no choice but to modify our BTFs so that when there's an internal action event that modifies the potentially exposed state of the current BTF, then we also raise a dummy region event as follows:

    private void broadcastAsRegionEvent(FacesEvent event) {
        RichRegion region = findImmediateContainingRegion(event);
        if (region != null) {
            AttributeChangeEvent dummyRegionEvent =
                new AttributeChangeEvent(region, "dummy", null, null);
            region.broadcast(dummyRegionEvent);
        }
    }
    private RichRegion findImmediateContainingRegion(FacesEvent event) {
        UIComponent comp = event.getComponent();
        while (!(comp instanceof RichRegion)) {
            comp = comp.getParent();
        }
        if (comp instanceof RichRegion) {
            return (RichRegion)comp;
        }
        return null;
    }
Below are some sample action listeners that calls the broadcastAsRegionEvent() method above:
    public void edit(ActionEvent actionEvent) {
        //some other operations here

        getPageFlowScope().put(EDIT_MODE, true);

        //workaround so that simply referencing the region
        //as partial trigger will work
        //in real app, need to confirm if the BTF is indeed used as region
        broadcastAsRegionEvent(actionEvent);
    }

    public void cancel(ActionEvent actionEvent) {
        //some other operations here
        getPageFlowScope().put(EDIT_MODE, false);
        broadcastAsRegionEvent(actionEvent);
    }

Wheew! I have the feeling that I have gone too far off :-( . This just started on the challenge of disabling a parent page component when my bounded task flow is on edit mode. Guys, comments and feedback are very much appreciated.

You can download the sample application from here.


Tuesday, October 26, 2010

Bounded Task Flows as Components with Exposed State or Attributes

Overview

Bounded Task Flows (BTFs) can be considered a breakthrough in again bringing the concept of web component reuse to a new level. BTFs can be package into ADF Library JAR files and placed into to a reusable component repository, in which they can be applied in multiple projects and/or applications. This document describes a way on how to make BTFs a more full-pledged interactive component by incorporating them with state and/or attributes.

Problem Description

BTFs have a way to communicate with other BTFs and their containing page through contextual events in which they can pass data as part of the event payload. They can also be navigated from outside through "queueActionEventInRegion()" method exposed by the RichRegion component. But BTF has a major shortcoming as a component, and that is, it does not have an exposed state or attributes.

Solution Description

Undeniably, pageFlowScope is where the internal state and attributes of BTFs are usually kept. As a matter of fact, if you define input parameters, JDeveloper will automatically create the value expressions which are in pageFlowScope. This pageFlowScope is unique per instance of the BTF and will last long from an instance initialization up to a return activity, fault, or explicit detachment(like setting the region with a different TaskFlowId), but is not accessible outside the BTF. This solution provides a way on how the attributes of a bounded task flow can be optionally exposed to other components of the page beyond the BTF boundary.

The User Experience

Figure 1: The main page "Approve" button is enabled when the bounded task flow is not on editMode.
Figure 2: The "Approve" button on the main page is disabled when the bounded task flow was on edit mode.

Artifacts

Exposing the BTF attributes represented by the BTF pageFlowScope can be done in three steps:
  1. Define a string input parameter that will hold a unique value expression provided by the user.
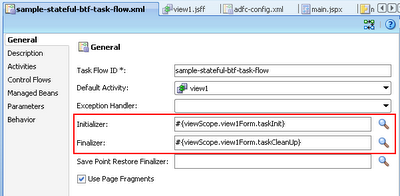
  2. Set the value expression with the pageFlowScope object in the initializer of the BTF.
  3. Set the value expression to null in the finalizer of the BTF to ensure objects are released.

The details of the steps are as follows:
  1. Define a string input parameter that will hold a unique value expression provided by the user.
    Figure 3: Input parameter definition of the string that represents a value expression.
    PageFlowScope is unique per instance of BTF, so it is the responsibility of the user(a developer) of the BTF to ensure that he is passing a unique externalStateValueHolder string value expression per region so that the region pageFlowScopeObjects will not collide which can lead to unexpected results.
  2. Set the value expression with the pageFlowScope object in the initializer of the BTF.
        public void taskInit() {
            //EXTERNAL_STATE_HOLDER is a string constant with value "externalStateHolder"
            String expression =
                (String)getPageFlowScope().get(EXTERNAL_STATE_HOLDER);
            if (expression != null) {
                JSFUtils.setManagedBeanValue(expression, getPageFlowScope());
            }
        }
    
  3. Set the value expression to null in the finalizer of the BTF to ensure objects are released.
        public void taskCleanUp() {
            String expression =
                (String)getPageFlowScope().get(EXTERNAL_STATE_HOLDER);
            if (expression != null) {
                //to ensure pageFlowScope is released upon unload of BTF
                JSFUtils.setManagedBeanValue(expression, null);
            }
        }
    
    Figure 4: Initializer and finalizer definition of the bounded task flow
Below are the other relevant artifacts in the prototype:
  • Region model definition
        <taskFlow id="samplestatefulbtftaskflow1"
                  taskFlowId="/WEB-INF/sample-stateful-btf-task-flow.xml#sample-stateful-btf-task-flow"
                  activation="deferred"
                  xmlns="http://xmlns.oracle.com/adf/controller/binding">
          <parameters>
            <parameter id="externalStateHolder"
                       value="sessionScope.region1StateHolder"/>
          </parameters>
        </taskFlow>
    
  • Toolbar button disabled attribute
        <af:commandToolbarButton text="Approve" id="ctb1"
               partialTriggers="r1:ctb1 r1:ctb2 r1:ctb3"
               disabled="#{sessionScope.region1StateHolder['editMode'] eq 'true'}"
               actionListener="#{viewScope.mainForm.approve}"/>
    

Prototype

You can download the sample application from here.

Resources

  • Initiate Control Flow Within A Region From Its Parent Page Functional Pattern

Caveat

Care should be taken when you are exposing the BTFs pageFlowScope to the outside world (outside the boundaries of the BTF), because it could lead your BTFs to unexpected inconsistent state. The solution just illustrate the concept and it can easily be tweak to exposed a much restricted Map object instead of the pageFlowScope.

Wednesday, September 1, 2010

ADF Faces RC: Generic Query and ListOfValues Model for EJBs

Overview

The <af:query> and <af:inputListOfValues> components of ADF Faces RC are a must-have for applications, but if you are not using ADF Business Components, then you face the challenge of implementing your own query and listOfValues models. This pattern provides an implemented reusable model that you can readily adapt to your enterprise needs when you are using EJBs.

Problem Description

The query and listOfValues models are fairly complex. To build a query model alone, you need to extend and implement at least six abstract classes as depicted in the diagram below:
Figure 1: Query Model Class Diagram
Plus some additional classes to build the listOfValues model as depicted below:
Figure 2: ListOfValues Model Class Diagram
If you try to look into how these were implemented for ADF BC, you could easily get lost in the details, especially that our focus is to build business applications and not UI components, on the other hand, if you look into the DemoQueryModel and DemoListOfValuesModel implemented in the adffacesdemo, then those implementations were suggesting "I'm stiff and useless, don't dare create something like me.". I am telling this because I have been into these hardships.

Technical Pattern Description

Let us get back to the basic requirement and the existing set of capabilities of the technologies that we use. The basic requirement is to provide the end-user a component where he can set criteria based on existing attributes and execute query to get a filtered result.
The following are the existing capabilities:
  • EJB's JPQL supports dynamic queries so we can create a session bean method that accepts a JPQL statement, as in the case of "queryByRange()", and create EJB DataControls out of them.
  • We can drag the data control on the page to create tables. In the process, a tree binding is created in the page definition file. In this tree binding, we can access the relevant attributes and accessors of the information that we are interested in. On the same tree binding, we can get the resulting class, and the corresponding CollectionModel.
  • By implementing some sort of dummy Map interface, we can allow passing of parameters through EL.
  • When we declare our model as managed beans, we can inject managed properties. Through managed properties, we can pass the the unique list of saved search per query and the object that will handle persistence.
From the requirement and capabilities described above, I came up with a solution that is simple to use, reusable, and manageable from the complexity perspective. This solution has one basic requirement - a valid treeBinding defined in the pageDefinition file that is based on a method that accepts a "jpqlStmt" parameter. The solution hits three birds in one shot, because it supports the QueryModel, the ListOfValuesModel, and a Dynamic Converter to convert the string input into appropriate entity objects.

The User Experience

The saved searches that are injected on the managed beans will be displayed on the saved search list:
Figure 3: List page showing a query defined from managed bean

If no saved search is injected, the system will generate one, named "System Generated", setting the first attribute defined in the pageDefinition file as a search field.
Figure 4: Job list page showing a query with a system generated saved search.

Users will be able to use the accessor attributes as part of the search criteria. The displayed label supports internationalization.
Figure 5: Add Fields menu showing list of attributes including those of the accessors. 

Search is NOT case-sensitive.
Figure 6: Case In-sensitive search.

Aside from the primary components, the query panel can have selectComboBox, selectOneChoice, and inputListOfValues components as well (inputComboBoxListOfValues can be easily supported too).
Figure 7: A launched job.Job Id inputListOfValues  from the query panel.
Displayed below are three inputListOfValues component based on the same ListOfValuesModel class but different treeBindings.
Figure 8: Job, department, and manager LOVs based on the same model class.

Below is a launched Job Search. Selections made here are ensured to be easily converted to objects by using the dynamic converter.
Figure 9: A launched Job Search having the default system generated criterion

Artifacts

The QueryLOV class alone contains more than a thousand lines of code, so I leave the sample application which do have comments to speak of its own. Instead, in this section, I will show the artifacts in using the solution:
  • The employeeQuery managed bean declaration in the employee-list-task-flow:
    Figure 10: The employeeQuery managed bean definition in employee-list-task-flow.

    The employeeQuery has a defined "systemSavedSearchDefList" managed property which is a list. Inside this list is a value that points to another managed bean named "savedSearch1". Inside "savedSearch1" is a list with a value referencing to managed bean "searchField1". These managed properties are optional. If you did not specify a managed saved search list property, the QueryLOV will generate a default.

    The "supplementaryMap" property is a map with an entry that points to the jobLOV managed bean. This property supplements the model that made possible the presence of the Job inputListOfValue component on the query panel of the employee search.

  • Below is the source of the query component as used in the employee_list.jsff search page:
    <af:query headerText="Search" disclosed="true" id="q1"
        model="#{pageFlowScope.employeeQuery.param['bindings.Employee'].queryModel}"
        value="#{pageFlowScope.employeeQuery.param['bindings.Employee'].currentDescriptor}"
        resultComponentId="::pc1:t1"
        queryListener="#{pageFlowScope.employeeQuery.processQuery}"/>
    
    The 'bindings.Employee' is the name of the tree binding in the page definition file that is based on a methodAction "findEmployeesByCriteria" that accepts a "jpqlStmt" parameter.

  • Below is the source of the Job Search LOV in employee_details.jsff form page.
    <af:inputListOfValues label="Job"
        popupTitle="Search and Result Dialog" id="ilov2" searchDesc="Job Search"
        model="#{pageFlowScope.jobLOV.param['bindings.Job'].listOfValuesModel}"
        value="#{bindings.findEmployeeByIdIterator.currentRow.dataProvider.job}"
        converter="#{pageFlowScope.jobLOV.param['bindings.Job'].convert['jobId']}"
        autoSubmit="true" readOnly="#{!pageFlowScope.editMode}"/>
    
    The same as the 'bindings.Employee' above, the 'bindings.Job is the name of the tree binding in the page definition file that is based on a methodAction "findJobsByCriteria" that accepts a "jpqlStmt" parameter.
    The string 'jobId' is passed as parameter in .convert['jobId'] so that the dynamic converter will know how to transform our strings into Job objects.
    It is also important that you override the toString() method of your entities to return the id (jobId in the case of Job)representation of your object.

Pattern Implementation

To implement this Reusable Query and ListOfValues Model into your existing application, do the following steps:
  1. Download the accompanying sample application.
  2. Inside your existing application, open the EJBQueryLOV project by invoking "Open Project" menu and navigating to the directory of the sample application.
  3. Open project properties of your ViewController project and add a dependency on the EJBQueryLOV build output.
  4. The EJBQueryLOV projects has some dependency on the utility classes in the Utils project in the sample application. You could add the JSFUtils.jar inside the deploy folder into your classpath.

Prototype

You can download the sample application with the reusable query and listOfValues model project from here.

Known Issues

Sometimes, invoking the "Search" button on the Query component do not raise the necessary lifecycle process that will trigger the result component to refresh. In this case, the "Search" button needs to be invoked again.

When you drag a data control with a resulting entity that do have a recursive relation to itself - like in the case of Employee with attribute manager, in which manager is also an employee, for some reasons, JDeveloper do not create a separate node binding for the manager inside the tree binding in the pageDefinition file. In this case, you need to manually add the necessary node definition to support the query by manager attributes and to comply with underlying assumption of the QueryLOV that the sequence of the defined accessors in the primary node definition of the tree binding is laid out on the same sequence in the subsequent nodes.
To illustrate the case please see the default generated code VS. the necessary modified version of the tree binding
Generated Default:
    <tree IterBinding="findEmployeesByCriteriaIterator" id="Employee">
      <nodeDefinition DefName="src.model.Employee" Name="Employee0">
        <AttrNames>
          <Item Value="employeeId"/>
          <Item Value="firstName"/>
          <Item Value="lastName"/>
          <Item Value="email"/>
          <Item Value="commissionPct"/>
          <Item Value="hireDate"/>
          <Item Value="phoneNumber"/>
          <Item Value="salary"/>
        </AttrNames>
        <Accessors>
          <Item Value="department"/>
          <Item Value="manager"/>
          <Item Value="job"/>
        </Accessors>
      </nodeDefinition>
      <nodeDefinition DefName="src.model.Department" Name="Employee1">
        <AttrNames>
          <Item Value="departmentId"/>
          <Item Value="departmentName"/>
          <Item Value="locationId"/>
        </AttrNames>
      </nodeDefinition>
      <nodeDefinition DefName="src.model.Job" Name="Employee2">
        <AttrNames>
          <Item Value="jobId"/>
          <Item Value="jobTitle"/>
          <Item Value="maxSalary"/>
          <Item Value="minSalary"/>
        </AttrNames>
      </nodeDefinition>
    </tree>

The necessary modified version to comply with the QueryLOV assumption:
    <tree IterBinding="findEmployeesByCriteriaIterator" id="Employee">
      <nodeDefinition DefName="src.model.Employee" Name="Employee0">
        <AttrNames>
          <Item Value="employeeId"/>
          <Item Value="firstName"/>
          <Item Value="lastName"/>
          <Item Value="email"/>
          <Item Value="commissionPct"/>
          <Item Value="hireDate"/>
          <Item Value="phoneNumber"/>
          <Item Value="salary"/>
        </AttrNames>
        <Accessors>
          <Item Value="department"/>
          <Item Value="manager"/>
          <Item Value="job"/>
        </Accessors>
      </nodeDefinition>
      <nodeDefinition DefName="src.model.Department" Name="department">
        <AttrNames>
          <Item Value="departmentId"/>
          <Item Value="departmentName"/>
          <Item Value="locationId"/>
        </AttrNames>
      </nodeDefinition>
       <nodeDefinition DefName="src.model.Employee" Name="manager">
        <AttrNames>
          <Item Value="employeeId"/>
          <Item Value="firstName"/>
          <Item Value="lastName"/>
          <Item Value="email"/>
          <Item Value="commissionPct"/>
          <Item Value="hireDate"/>
          <Item Value="phoneNumber"/>
          <Item Value="salary"/>
        </AttrNames>
      </nodeDefinition>
      <nodeDefinition DefName="src.model.Job" Name="job">
        <AttrNames>
          <Item Value="jobId"/>
          <Item Value="jobTitle"/>
          <Item Value="maxSalary"/>
          <Item Value="minSalary"/>
        </AttrNames>
      </nodeDefinition>
    </tree>
Note that the node names are not necessary but the sequence. The sequence of the node definition after the primary should be the same as the sequence of the defined accessors (department, manager, then job).

Related Patterns

The sample application is based on the ADF UI Shell Functional Pattern.


Authors Notes

I would to recognize other people who also have contributed on the evolution of this solution, specifically, Java Powers of http://javainthedesert.blogspot.com/.

Saturday, March 20, 2010

ADF Faces RC: Change the Global Date Format of Your Application

To change the date format of your application, without necessarily affecting other locale settings like Language(localized text) ,or to established a standard global date format across different locales/countries, define the <formatting-locale> element of the trinidad-config.xml as illustrated below:
<?xml version="1.0" encoding="windows-1252"?>
<trinidad-config xmlns="http://myfaces.apache.org/trinidad/config">
  <formatting-locale>en-GB</formatting-locale>
</trinidad-config>
You can also define it with an EL that resolve to a java.util.Locale instead of a hard text (like en-GB)
<?xml version="1.0" encoding="windows-1252"?>
<trinidad-config xmlns="http://myfaces.apache.org/trinidad/config">
  <formatting-locale>#{userSession.formattingLocale}</formatting-locale>
</trinidad-config>
default (based on my browser's locale):

with formatting-locale set to "en-GB":

with formatting-locale set to "fr-CA":

with formatting-locale set to "ja":


Below is a quotation from section A.6.2.8 (Formatting Dates and Numbers Locale) of the Web User Interface Developer's Guide:
By default, ADF Faces and MyFaces Trinidad will format dates (including the first day of the week) and numbers in the same locale used for localized text (which by default is the locale of the browser). If, however, you want dates and numbers formatted in a different locale, you can use the element, which takes an IANA-formatted locale (for example, ja, fr-CA) as its value. The contents of this element can also be an EL expression pointing at an IANA string or a java.util.Locale object.
Two things that I have observed:
  1. The formatting-locale is case sensitive. For example, replacing "en-GB" with "en-gb" will NOT make localization work.
  2. When using EL, the expression should resolved to a java.util.Locale. An expression that resolves to a string like "en-GB" will throw an exception.

To learn how to bind configuration values to managed bean and/or how to configure general locale settings, please see the following post:
ADF Faces RC : Supplement on How to Configure Pages for an End User to Specify Locale at Runtime

Cheers!

Friday, March 12, 2010

ADF Faces RC: Grab that ADF Skins in 5 minutes

In this post, I applied skinning to the accompanying demo application (UIShellSherman_V02)of the ADF UI Shell to demonstrate how easy it is to apply skinning into an existing ADF application . You can do the same into your current application in just a matter of 5 minutes by following this blogpost. Impress your boss now! :D
Oracle ADF Faces RC has the following skins which could jump-start implementation of skinning into your application:
  • fusion

  • rainforest

  • sporty

  • princess

  • blafplus-rich
  • blafplus-medium
  • fusion projector
  • simple

Before you start the steps below, be sure that you have an extracted copy of the latest adffacesdemo. You can download the same here.

The time starts now...

To apply skinning into your app, do the following:
  1. Copy the skins folder of adffacesdemo.
  2. Copy the trinidad-skins.xml of the adffacesdemo
  3. Add additional "skinFamily" string attribute into your existing session scope managed bean that holds user session information.
  4. Add a skin menu into your menu bar.

Copy the skins folder of adffacesdemo

Copy the skins folder of adffacesdemo located in .../adffacesdemo/public_html and paste it into the public_html directory of your application.

Copy the trinidad-skins.xml of the adffacesdemo

Copy the trinidad-skins.xml of the adffacesdemo located in .../adffacesdemo/public_html/WEB_INF folder and paste the same on the same directory in your application

Add additional "skinFamily" string attribute into your existing session scope managed bean

You can add the "skinFamily" string attribute into an existing session scope manage bean that holds user session information. If nothing is applicable, you can create something like the following class and declare it as a session scope managed bean in adfc-config.xml
package soadev.view.managed;

import java.io.IOException;
import javax.faces.context.ExternalContext;
import javax.faces.context.FacesContext;
import javax.faces.event.ActionEvent;
import oracle.adf.view.rich.component.rich.nav.RichCommandMenuItem;

public class UserSession {
    private String skinFamily;

    public void setSkinFamily(String skinFamily) {
        this.skinFamily = skinFamily;
        reloadThePage();
    }

    public String getSkinFamily() {
        if (skinFamily == null) {
            skinFamily = "fusion";
        }
        return skinFamily;
    }

    public void skinMenuAction(ActionEvent event) {
        RichCommandMenuItem menuItem = (RichCommandMenuItem)event.getComponent();
        setSkinFamily(menuItem.getText());
        reloadThePage();
    }
    
    //taken from adffacesdemo
    public static void reloadThePage() {
        FacesContext fContext = FacesContext.getCurrentInstance();
        String viewId = fContext.getViewRoot().getViewId();
        String actionUrl =
            fContext.getApplication().getViewHandler().getActionURL(fContext,
                                                                    viewId);
        try {
            ExternalContext eContext = fContext.getExternalContext();
            String resourceUrl =
                actionUrl; //eContext.encodeResourceURL(actionUrl);
            // Use the action URL directly since the encoding a resource URL will NPE in isEmailablePage()
            eContext.redirect(resourceUrl);
        } catch (IOException ioe) {
            System.err.println("Problem trying to reload the page:");
            ioe.printStackTrace();
        }
    }  
}

Add a skin menu into your menu bar

Add a skin menu into your existing menu bar plus menuCommandItems for the skins to be supported. Below is a sample menuBar with a skin menu:
    <af:menuBar id="menuBar" styleClass="AFHideSidePadding">
      <af:menu text="Skin" id="ptm1">
        <af:commandMenuItem text="blafplus-rich" type="radio"
                            actionListener="#{userSession.skinMenuAction}"
                            selected="#{userSession.skinFamily=='blafplus-rich'}"
                            id="ptcmi1"/>
        <af:commandMenuItem text="blafplus-medium" type="radio"
                            actionListener="#{userSession.skinMenuAction}"
                            selected="#{userSession.skinFamily=='blafplus-medium'}"
                            id="ptcmi2"/>
        <af:commandMenuItem text="fusion" type="radio"
                            actionListener="#{userSession.skinMenuAction}"
                            selected="#{userSession.skinFamily=='fusion'}"
                            id="ptcmi31"/>
        <af:commandMenuItem text="fusion-projector" type="radio"
                            actionListener="#{userSession.skinMenuAction}"
                            selected="#{userSession.skinFamily=='fusion-projector'}"
                            id="ptcmi31_1"/>
        <af:commandMenuItem text="simple" type="radio"
                            actionListener="#{userSession.skinMenuAction}"
                            selected="#{userSession.skinFamily=='simple'}"
                            id="ptcmi4"/>
        <af:commandMenuItem text="rainforest" type="radio"
                            actionListener="#{userSession.skinMenuAction}"
                            selected="#{userSession.skinFamily=='rainforest'}"
                            id="ptcmi6"/>
        <af:commandMenuItem text="sporty" type="radio"
                            actionListener="#{userSession.skinMenuAction}"
                            selected="#{userSession.skinFamily=='sporty'}"
                            id="ptcmi7"/>
        <af:commandMenuItem text="princess" type="radio"
                            actionListener="#{userSession.skinMenuAction}"
                            selected="#{userSession.skinFamily=='princess'}"
                            id="ptcmi8"/>
      </af:menu>
    </af:menuBar>
Your done? Congratulations! :D

How did I apply it to the accompanying app (UIShellSherman_V02)?

  • I created a global_links.jspx with the following code:
    <?xml version='1.0' encoding='UTF-8'?>
    <jsp:root xmlns:jsp="http://java.sun.com/JSP/Page" version="2.1"
              xmlns:f="http://java.sun.com/jsf/core"
              xmlns:h="http://java.sun.com/jsf/html"
              xmlns:af="http://xmlns.oracle.com/adf/faces/rich"
              xmlns:trh="http://myfaces.apache.org/trinidad/html">
      <jsp:directive.page contentType="text/html;charset=UTF-8"/>
      <af:panelGroupLayout id="pgl1">
        <af:menuBar id="menuBar" styleClass="AFHideSidePadding">
          <af:menu text="Skin" id="ptm1">
            <af:commandMenuItem text="blafplus-rich" type="radio"
                                actionListener="#{userSession.skinMenuAction}"
                                selected="#{userSession.skinFamily=='blafplus-rich'}"
                                id="ptcmi1"/>
            <af:commandMenuItem text="blafplus-medium" type="radio"
                                actionListener="#{userSession.skinMenuAction}"
                                selected="#{userSession.skinFamily=='blafplus-medium'}"
                                id="ptcmi2"/>
            <af:commandMenuItem text="fusion" type="radio"
                                actionListener="#{userSession.skinMenuAction}"
                                selected="#{userSession.skinFamily=='fusion'}"
                                id="ptcmi31"/>
            <af:commandMenuItem text="fusion-projector" type="radio"
                                actionListener="#{userSession.skinMenuAction}"
                                selected="#{userSession.skinFamily=='fusion-projector'}"
                                id="ptcmi31_1"/>
            <af:commandMenuItem text="simple" type="radio"
                                actionListener="#{userSession.skinMenuAction}"
                                selected="#{userSession.skinFamily=='simple'}"
                                id="ptcmi4"/>
            <af:commandMenuItem text="rainforest" type="radio"
                                actionListener="#{userSession.skinMenuAction}"
                                selected="#{userSession.skinFamily=='rainforest'}"
                                id="ptcmi6"/>
            <af:commandMenuItem text="sporty" type="radio"
                                actionListener="#{userSession.skinMenuAction}"
                                selected="#{userSession.skinFamily=='sporty'}"
                                id="ptcmi7"/>
            <af:commandMenuItem text="princess" type="radio"
                                actionListener="#{userSession.skinMenuAction}"
                                selected="#{userSession.skinFamily=='princess'}"
                                id="ptcmi8"/>
          </af:menu>
        </af:menuBar>
      </af:panelGroupLayout>
    </jsp:root>
    

  • I added a <jsp:include> tag to the globalLinks facet of the pages that implement the ADF UI Shell template. Below is a code snippet:
    <f:facet name="globalLinks">
      <f:subview id="sv1">
        <jsp:include page="/global_links.jspx" flush="true"/>
      </f:subview>
    </f:facet>
    

Conclusion

In this post we learn the following "how tos":
  • How to easily apply skinning into an existing ADF Faces RC application.
  • How to reload a page programmatically.
  • How to use <jsp:include> tag in ADF pages.
Cheers!

Wednesday, March 10, 2010

ADF Faces RC : Supplement on How to Configure Pages for an End User to Specify Locale at Runtime

I am completely lost when I read section 21.4 (Configuring Pages for an End User to Specify Locale at Runtime) of the Web User Interface Developer's Guide. Correct me if I am wrong, but it seems that, that section is still in draft mode as of this blog-posting, and that motivated me to write this post to supplement it. This post references some other sections of the guide to as not recreate instructions here. This post assumes that you already know how to configure resource bundles and how to bind the component labels to those resource bundles (also available on the guide).

We can configure our application so that end users can specify the preferred locale at runtime without them going through the browser settings. To support this we need to do the following:

  1. Register the locales and resource bundles used in your application in the faces-config.xml file.
  2. Add a String locale attribute to a session scope managed bean that holds relevant information for the user session.
  3. Create a selectOneChoice that list the supported locales from step 1 above.
  4. Set the locale attribute of the <f:view> tag of our pages to the attribute the we created.

Register the locales and resource bundles used in your application in the faces-config.xml file.

Please see section 21.3.3 (How to Register Locales and Resource Bundles in Your Application) of the Web User Interface Developer's Guide.


Add a String locale attribute to a session scope managed bean that holds relevant information for the user session

We can add the locale attribute to an existing session scope managed bean that holds other user session information or create a new one if nothing is available. We use "session scope" here so that the locale information is applied to the whole session instead of the user setting the local on every page. Below is a sample managed bean class:

package soadev.view.managed;

import java.io.Serializable;
import java.util.ArrayList;
import java.util.Iterator;
import java.util.List;
import java.util.Locale;
import javax.faces.application.Application;
import javax.faces.context.FacesContext;
import javax.faces.model.SelectItem;
public class UserSession implements Serializable {
    private String locale;
  
    public void setLocale(String locale) {
        this.locale = locale;
    }

    public String getLocale() {
        if (locale == null) {
            locale = FacesContext.getCurrentInstance().getViewRoot()
                .getLocale().toString();
        }
        return locale;
    }

    //gets all the supported locals plus the default locale defined in the faces-config.xml
    //and add it to the list of selectItems
    public List<SelectItem> getLocales() {
        List<SelectItem> items = new ArrayList<SelectItem>();
        Application application = FacesContext.getCurrentInstance()
                            .getApplication();
        Iterator supportedLocales = application.getSupportedLocales();
        while (supportedLocales.hasNext()) {
            Locale locale = (Locale) supportedLocales.next();
            items.add(new SelectItem(locale.toString(), locale.getDisplayName(locale)));
        }
        Locale defaultLocale = application.getDefaultLocale();
        items.add(new SelectItem(defaultLocale.toString(), defaultLocale.getDisplayName(defaultLocale)));
        return items;
    }
}

Create a selectOneChoice that list the supported locales from step 1 above.

Add somewhere in the page or in a user preferrence popup a selectOneChoice like below:
<af:selectOneChoice label="Select Locale" id="pt_soc2"
                     value="#{userSession.locale}"
                     autoSubmit="true">
  <f:selectItems id="si10" value="#{userSession.locales}"/>
</af:selectOneChoice>

Set the locale attribute of the <f:view> tag of our pages to the attribute the we created.

<?xml version='1.0' encoding='UTF-8'?>
<jsp:root xmlns:jsp="http://java.sun.com/JSP/Page" version="2.1"
          xmlns:f="http://java.sun.com/jsf/core"
          xmlns:h="http://java.sun.com/jsf/html"
          xmlns:af="http://xmlns.oracle.com/adf/faces/rich">
  <jsp:directive.page contentType="text/html;charset=UTF-8"/>
  <f:view locale="#{userSession.locale}">

Caveat: To simplify the illustration in this post, we added our locale attribute directly to the session scope managed bean, but in practice we usually create a sort of UserPrefence class to hold the user preferred locale plus other preferences like adf skin, rowBandingIntervals, and etc... I just thought that maybe creating a post on how to implement user preference maybe worth. Is it?


Cheers!

Sunday, February 28, 2010

Oracle ADF and Google Translate : Leveraging Google Translation Services in Oracle ADF Applications

An application that will be used in a multi-cultural and multi-language environment can leverage the free translation service of Google through Google Translate API.

This post recreated the Google Translate service using Oracle ADF Faces RC in JDeveloper 11g to demonstrate the simplicity and the possibilities of using the Google Translate API. Below are screen shots of our completed Google Translate API demo in ADF:
 
Just like the official Google Translate page, the screen shot above shows that we can choose the "from what" and "to what" language shall we translate. Invoking the "Translate" button will display the translated text without full submit of the page.
 
Invoking "Clear" button will reset the components.

To recreate this demo we need to do the following:
  1. Download the Java client API for using Google Translate.
  2. Create a new JDeveloper application with one view-controller project.
  3. Create the translate.jspx page
  4. Create the GoogleTranslateForm class (the backing bean of translate.jspx)
  5. Create and register a LanguageEnumConverter class

Download the Java client API for using Google Translate.

The unofficial Java client API is only about 44KB. We can download it from the following link: google-api-translate-java. To use it, we just simply include the google-api-translate-java.jar file into our application's classpath.

Create a new JDeveloper application with one view-controller project.

Create a new generic application with one view-controller project in which ADF Faces and ADF Page Flows project technologies are selected. The ADF Page Flows is optional, but we use it for consistency.
Below is a screen shot of my sample project structure:

Create the translate.jspx page

To create the translate.jspx page, we need to open adfc-config.xml, drop a view object, named it "translate", double click it to invoke the create page wizard. Basically our page will have the following components:
  • an inputText component to hold user input;
  • two selectOneChoice component to hold the Language From and Language To;
  • a button to to invoke the translation service; and
  • a button to reset the form
Below is my translate.jspx page:
<?xml version='1.0' encoding='UTF-8'?>
<jsp:root xmlns:jsp="http://java.sun.com/JSP/Page" version="2.1"
          xmlns:f="http://java.sun.com/jsf/core"
          xmlns:h="http://java.sun.com/jsf/html"
          xmlns:af="http://xmlns.oracle.com/adf/faces/rich">
  <jsp:directive.page contentType="text/html;charset=UTF-8"/>
  <f:view>
    <af:document id="d1">
      <af:form id="f1">
        <af:panelGroupLayout layout="scroll"
                             xmlns:af="http://xmlns.oracle.com/adf/faces/rich"
                             id="pgl2">
          <af:panelGroupLayout id="pgl7" layout="horizontal">
            <af:image source="/images/translate_logo.gif" id="i1"/>
            <af:activeOutputText value="API Demo in ADF" id="aot1"
                                 inlineStyle="font-size:medium;"/>
          </af:panelGroupLayout>
          <af:outputText value="Translate text, webpages and documents" id="ot2"
                         inlineStyle="font-size:medium; font-weight:bold;"/>
          <af:panelFormLayout id="pfl1" labelAlignment="top">
            <af:inputText id="it1" columns="100" rows="6"
                          label="Enter text or a webpage URL, or upload a document."
                          value="#{backingBeanScope.googleTranslate.input}"
                          autoSubmit="true" partialTriggers="cb2"/>
            <f:facet name="footer">
              <af:panelGroupLayout id="pgl3">
                <af:panelGroupLayout id="pgl5" layout="horizontal">
                  <af:panelGroupLayout id="pgl6">
                    <af:panelFormLayout id="pfl2" labelAlignment="start">
                      <af:selectOneChoice label="Translate From" id="soc1"
                                          value="#{backingBeanScope.googleTranslate.translateFrom}"
                                          autoSubmit="true"
                                          converter="LanguageEnumConverter">
                        <f:selectItems value="#{backingBeanScope.googleTranslate.languageItems}"
                                       id="si1"/>
                      </af:selectOneChoice>
                      <af:selectOneChoice label="Translate To" id="soc2"
                                          value="#{backingBeanScope.googleTranslate.translateTo}"
                                          autoSubmit="true"
                                          converter="LanguageEnumConverter">
                        <f:selectItems value="#{backingBeanScope.googleTranslate.languageItems}"
                                       id="si2"/>
                      </af:selectOneChoice>
                    </af:panelFormLayout>
                    <f:facet name="separator"/>
                  </af:panelGroupLayout>
                  <af:panelGroupLayout id="pgl1">
                    <af:commandButton text="Translate" id="cb1"
                                      actionListener="#{backingBeanScope.googleTranslate.translate}"
                                      partialSubmit="true"/>
                    <af:commandButton text="Clear" id="cb2"
                                      actionListener="#{backingBeanScope.googleTranslate.clear}"/>
                    <f:facet name="separator">
                      <af:spacer width="10" height="10" id="s3"/>
                    </f:facet>
                  </af:panelGroupLayout>
                  <f:facet name="separator">
                    <af:spacer width="20" height="10" id="s1"/>
                  </f:facet>
                </af:panelGroupLayout>
                <af:panelGroupLayout id="pgl4" inlineStyle="width:800.0px;">
                  <af:separator id="s2"/>
                  <af:outputText value="#{backingBeanScope.googleTranslate.translated}"
                                 id="ot1" partialTriggers="cb1 cb2"/>
                </af:panelGroupLayout>
              </af:panelGroupLayout>
            </f:facet>
          </af:panelFormLayout>
        </af:panelGroupLayout>
      </af:form>
    </af:document>
  </f:view>
</jsp:root>

Create the GoogleTranslateForm class (the backing bean of translate.jspx)

The GoogleTranslateForm class is a backing bean that will hold the server side values of our components. In addition, it also provide selectItems composed of Google Translate API Language Enum.

ADF Faces RC greatly simplifies our development because of the partial page rendering (PPR) and auto submit features. As you can see in my code below, to implement the functionality, I don't even have a single value changed listener.
package soadev.blogspot.googletranslateapi.backing;

import com.google.api.translate.Language;
import com.google.api.translate.Translate;
import java.util.ArrayList;
import java.util.List;
import javax.faces.event.ActionEvent;
import javax.faces.model.SelectItem;

public class GoogleTranslateForm {
    private List <SelectItem> languageItems;
    private String input;
    private Language translateFrom = Language.ENGLISH;
    private Language translateTo = Language.DUTCH;
    private String translated;

    public void setLanguageItems(List<SelectItem> languages) {
        this.languageItems = languages;
    }

    public List<SelectItem> getLanguageItems() {
        if (languageItems == null){         
            languageItems = new ArrayList<SelectItem>();
            languageItems.add(new SelectItem(Language.ENGLISH, "ENGLISH"));
            languageItems.add(new SelectItem(Language.DANISH, "DANISH"));
            languageItems.add(new SelectItem(Language.DUTCH, "DUTCH"));
            languageItems.add(new SelectItem(Language.FILIPINO, "FILIPINO"));
            languageItems.add(new SelectItem(Language.NORWEGIAN, "NORWEGIAN"));
            languageItems.add(new SelectItem(Language.ARABIC, "ARABIC"));
            languageItems.add(new SelectItem(Language.CHINESE_SIMPLIFIED, "CHINESE_SIMPLIFIED"));
            languageItems.add(new SelectItem(Language.CHINESE_TRADITIONAL, "CHINESE_TRADITIONAL"));
            languageItems.add(new SelectItem(Language.FRENCH, "FRENCH"));
            languageItems.add(new SelectItem(Language.GERMAN, "GERMAN"));
            languageItems.add(new SelectItem(Language.GREEK, "GREEK"));
            languageItems.add(new SelectItem(Language.ITALIAN, "ITALIAN"));
            languageItems.add(new SelectItem(Language.JAPANESE, "JAPANESE"));
            languageItems.add(new SelectItem(Language.KOREAN, "KOREAN"));
            languageItems.add(new SelectItem(Language.RUSSIAN, "RUSSIAN"));
            languageItems.add(new SelectItem(Language.SPANISH, "SPANISH"));
        }
        return languageItems;
    }

    public void setInput(String input) {
        this.input = input;
    }

    public String getInput() {
        return input;
    }

    public void setTranslateFrom(Language translateFrom) {
        this.translateFrom = translateFrom;
    }

    public Language getTranslateFrom() {
        return translateFrom;
    }

    public void setTranslateTo(Language translateTo) {
        this.translateTo = translateTo;
    }

    public Language getTranslateTo() {
        return translateTo;
    }

    public void setTranslated(String translated) {
        this.translated = translated;
    }

    public String getTranslated() {
        return translated;
    }

    public void translate(ActionEvent actionEvent) {
        
       try{
            translate();
        }
        catch (Exception e) {
            // TODO: Add catch code
            e.printStackTrace();
        }
    }
    public void translate() throws Exception{           
            if(input != null){
                //below are proxy related configuration
//                System.setProperty("http.proxyHost", "yourHost");             
//                System.setProperty("http.proxyPort", "8080");
                Translate.setHttpReferrer("http://localhost");
                translated = Translate.execute(input, getTranslateFrom(), getTranslateTo());
                
            }
    }

    public void clear(ActionEvent actionEvent) {
        input = null;
        translated = null;
    }
}

Create and register a LanguageEnumConverter class

Below is my LanguageEnumConverter class:
package soadev.blogspot.googletranslateapi.convert;

import com.google.api.translate.Language;
import javax.faces.component.UIComponent;
import javax.faces.context.FacesContext;
import javax.faces.convert.Converter;

public class LanguageEnumConverter implements Converter {
   
    @Override
    public Object getAsObject(FacesContext facesContext,
                              UIComponent uIComponent, String string) {
        return Language.fromString(string);
    }
    @Override
    public String getAsString(FacesContext facesContext,
                              UIComponent uiComponent, Object object) {
        return object.toString();
    }
}
We need to register this converter in faces-config.xml.
<?xml version="1.0" encoding="UTF-8"?>
<faces-config version="1.2" xmlns="http://java.sun.com/xml/ns/javaee">
  <application>
    <default-render-kit-id>oracle.adf.rich</default-render-kit-id>
  </application>
  <converter>
    <converter-id>LanguageEnumConverter</converter-id>
    <converter-class>soadev.blogspot.googletranslateapi.convert.LanguageEnumConverter</converter-class>
  </converter>
</faces-config>
This converter is used in the translate.jspx above.


Conclusion

With minimal effort, we can leverage the valuable service offered by Google Translate.
Cheers!

ps. If your testing behind a firewall that requires proxy authentication, read the following post.

Related Posts

Wednesday, February 24, 2010

ADF Faces RC: Building a Reusable Google Map Viewer that Supports both Geocoding and Reverse Geocoding (Applying Frank Nimphius' Declarative Lightweight Popup)

In this post, I will show you how to build a reusable Google Map Viewer that supports both Geocoding and Reverse Geocoding. This map viewer is implemented based on Frank Nimphius' declarative lightweight popup pattern. This can be incorporated from anywhere in your application that has address information.

Our steps to recreate this would be as follows:
  1. Sign up for the Google Maps API
  2. Create a new Task Flow named "google-map-viewer-task-flow" with a single view and a task-flow-return activity.
  3. Define task-flow input and return parameters
  4. Create and design the google_map.jspx
  5. Copy my javascript code
  6. Create the GoogleMapViewerForm (the backing bean of google_map.jspx)
  7. Integrate the google-map-viewer-task-flow as a task-flow-call activity into your existing task flows

Sign up for the Google Maps API

Go to the following site: http://code.google.com/apis/maps/signup.html and secure an API Key. A single Maps API key is valid for a single directory or domain. If you are testing your app using http://localhost:7101 or http://127.0.0.1:7101, then you should input that in the "My web site URL" textbox when generating the key. You must have a Google Account to get a Maps API key, and your API key will be connected to your Google Account. Keep the API Key for later use.

Create a new Task Flow named "google-map-viewer-task-flow" with a single view and a task-flow-return activity

Create the task flow with a single view named "google_map", a task-flow-return named "exit", and a control-flow-case named "return" as depicted below:

Define taskflow input and return parameters

Below are the optional input parameters and there definitions:
  • address - if a valid latitude or longitude parameter is not available, the map viewer will try to geocode the address;
  • latitude - both latitude and longitude should be provided so that the map viewer will process the coordinates and center it on map, otherwise the map viewer will just geocode for the address;
  • longitude - same as latitude info above;
  • countryCode - to prefer results to this country (but not to restrict the results); stated as a two-letter ISO compliant code;
Below are the defined output parameters which could return null values if no point was clicked on the map for reverse geocoding:
  • returnAddress - reverse geocode resulting address;
  • returnLatitude - selected point latitude;
  • returnLongitude - selected point longitude, selected coordinates are mark with an arrow marker;
  • returnDetails - if a point was selected in the map for reverse geocoding, the selected coordinates and the resulting details (all information from the client including the address above) will be returned here, otherwise null;

Create and design the google_map.jspx

Double click the google_map view in the task flow to invoke the "create page" wizard. You could put the page under ".../public_html/pages". Basically here are the items that we need to put on our page:
  • a clientListener that upon page load invokes the initialize javascript which inturn call a serverListener;
  • a serverListener mentioned above that invokes a server side code;
  • a <af:resource> component that will import our external javascript;
  • a panelHeader where the map will be placed;
  • an inputTextBox to input address to search.
  • a button to invoke search;
  • a button to return to the calling task-flow;
<?xml version="1.0" encoding="UTF-8"?>
<jsp:root xmlns:jsp="http://java.sun.com/JSP/Page" version="2.1"
          xmlns:f="http://java.sun.com/jsf/core"
          xmlns:h="http://java.sun.com/jsf/html"
          xmlns:af="http://xmlns.oracle.com/adf/faces/rich"
          xmlns:v="urn:schemas-microsoft-com:vml">
  <jsp:directive.page contentType="text/html;charset=UTF-8"/>
  <f:view>
    <af:document id="d1" clientComponent="true">
        <af:clientListener method="initialize" type="load" />
        <af:serverListener type="loadGoogleMap"
                           method="#{backingBeanScope.googleMapViewer.loadGoogleMap}" />
        <af:serverListener type="submitInfoToServer"
                           method="#{backingBeanScope.googleMapViewer.setReturnValues}" />
      
      <af:form id="f1" defaultCommand="cb1">
       
        <af:panelStretchLayout id="psl1" topHeight="auto">
          <f:facet name="center">
            <af:panelHeader id="mapPH" text=" "
                            inlineStyle="width:700PX; height: 400px">
              <f:facet name="toolbar"/>
            </af:panelHeader>
          </f:facet>
          <f:facet name="top">
            <af:panelBorderLayout id="pbl1">
              <f:facet name="start">
                <af:panelGroupLayout id="pgl2" layout="horizontal">
                  <af:inputText id="searchField" clientComponent="true"
                                columns="100"/>
                  <af:commandButton id="cb1" text="Search"
                                    clientComponent="true" partialSubmit="true">
                    <af:clientListener type="click" method="goFindAddress"/>
                  </af:commandButton>
                </af:panelGroupLayout>
              </f:facet>
              <f:facet name="end">
                <af:panelGroupLayout id="pgl1">
                  <af:commandButton text="Return" id="cb2" action="return"/>
                </af:panelGroupLayout>
              </f:facet>
            </af:panelBorderLayout>
          </f:facet>
        </af:panelStretchLayout>
      </af:form>
      <f:facet name="metaContainer">
        <af:group>
          <af:resource type="javascript" source="http://www.google.com/jsapi?key=YOUR_KEY_FROM_STEP_1"></af:resource>      
           <af:resource type="javascript">
    google.load("maps", "2.x");
   </af:resource>
   <af:resource type="javascript" source="/js/google_map_viewer.js"/>
   <af:resource type="javascript">
          window.onunload = GUnload;
          </af:resource>      
         </af:group>
      </f:facet>
    </af:document>
  </f:view>
</jsp:root>
Find the snippet below in the above code and replace the key with the key you generated in step 1:
<af:resource type="javascript" source="http://www.google.com/jsapi?key=YOUR_KEY_FROM_STEP_1"></af:resource>   

Copy my javascript code

This the bonus part. You'll just have to copy my code below for now and understand it later. Put the google_map_viewer.js under ".../public_html/js" folder.
/**http://soadev.blogspot.com/
*/

var map;
var geocoder;
var orig_coordinates;
var orig_marker;

function initialize(event) {
    var source = event.getSource();
    AdfCustomEvent.queue(source, "loadGoogleMap", 
    {
    },
false);
}

function initializeMap(clientId, latitude, longitude, address, countryCode) {
    if (GBrowserIsCompatible()) {
        map = new google.maps.Map2(document.getElementById(clientId));
        map.addControl(new GLargeMapControl());
        map.addControl(new GMapTypeControl());
        GEvent.addListener(map, 'click', getAddress);
        geocoder = new GClientGeocoder();
        //tailor to a particular domain (country)     
        if (countryCode) {
            geocoder.setBaseCountryCode(countryCode);
        }
        if (latitude != null && longitude != null) {
            //valid coordinates
            //set center of map to the coordinates and add a marker 
            orig_coordinates = new GLatLng(latitude, longitude);
            map.setCenter(orig_coordinates, 15);
            orig_marker = new GMarker(orig_coordinates);
            map.addOverlay(orig_marker);
            var info = "Original Coordinates: " + latitude + "," + longitude;
            addClickListener(orig_marker, info);
        }
        else {
            //none valid coordinates so try to find the address instead
            if (address != null) {
                findAddress(address);
            }
            else {
                //address is null so set center to default
                map.setCenter(new GLatLng(0, 0), 1);
            }
        }
    }
}

function getAddress(overlay, latlng) {
    //if far enough return
    if (map.getZoom() < 14) {
        return;
    }
    if (latlng != null) {
        var icon = createArrowIcon();
        arrow_marker = new GMarker(latlng, 
        {
            icon : icon
        });
        map.clearOverlays();
        map.addOverlay(arrow_marker);
        addClickListener(arrow_marker, latlng.toUrlValue());
        if (orig_marker) {
            map.addOverlay(orig_marker);
            var info = "Original Coordinates: " + orig_coordinates.toUrlValue();
            addClickListener(orig_marker, info);
        }
        //Reverse GeoCode
        geocoder.getLocations(latlng, showAddress);
    }
}

function createArrowIcon() {
    var icon = new GIcon();
    var url = "http://maps.google.com/mapfiles/";
    icon.image = url + "arrow.png";
    icon.shadow = url + "arrowshadow.png";
    icon.iconSize = new GSize(39, 34);
    icon.shadowSize = new GSize(39, 34);
    icon.iconAnchor = new GPoint(20, 34);
    icon.infoWindowAnchor = new GPoint(20, 0);
    return icon;
}

function showAddress(response) {
    if (!response || response.Status.code != 200) {
        alert("Status Code:" + response.Status.code);
    }
    else {
        submitInfoToServer(response);
        place = response.Placemark[0];
        plotPlace(place);
    }
}

function goFindAddress(event) {
    var searchField = event.getSource().findComponent("searchField");
    var input = searchField.getValue();
    findAddress(input);
    event.cancel();
}

function findAddress(input) {
    var address = input;
    //GeoCode
    if (geocoder) {
        geocoder.getLocations(input, function (response) {
            if (!response || response.Status.code != 200) {
                var index = address.indexOf(",");
                if (index ==  - 1) {
                    processPointNotFound();
                    return;
                }
                //simplify address by removing the details separated by comma
                address = address.substring(index + 1);
                //recurse until a point is found
                findAddress(address);
            }
            else {
                place = response.Placemark[0];
                plotPlace(place);
            }
        });
    }
}

function processPointNotFound() {
    alert("address not found");
    map.setCenter(new GLatlng(0, 0), 1);
}

function plotPlace(place) {
    var point = new GLatLng(place.Point.coordinates[1], place.Point.coordinates[0]);
    var marker = new GMarker(point);
    map.addOverlay(marker);
    map.setCenter(point, 14);
    var info = "<b>Result Coordinates:</b>" + point.toUrlValue() + "<br/>" + "<b>Address:</b>" + place.address + "<br/>" + "<b>Accuracy:</b>" + place.AddressDetails.Accuracy + "<br/>" + "<b>Country code:</b> " + place.AddressDetails.Country.CountryNameCode;
    addClickListener(marker, info);

}

function addClickListener(marker, info) {
    GEvent.addListener(marker, "click", function () {
        marker.openInfoWindowHtml(info);
    });
    marker.openInfoWindowHtml(info);
}

function submitInfoToServer(response) {
    var place = response.Placemark[0];
    var result_point = new GLatLng(place.Point.coordinates[1], place.Point.coordinates[0]);
    var address = place.address;
    var addressDetails = place.AddressDetails;
    var accuracy = addressDetails.Accuracy;
    var country = addressDetails.Country;
    var countryNameCode = country.CountryNameCode;
    var adminArea = country.AdministrativeArea;
    var adminAreaName;
    var locality;
    var localityName;
    var thoroughfare;
    var postalCode;
    if (adminArea != null) {
        adminAreaName = adminArea.AdministrativeAreaName;
        locality = adminArea.Locality;
        if (locality != null) {
            localityName = locality.LocalityName;
            thoroughfare = locality.Thoroughfare;
            postalCode = locality.PostalCode;
            if (thoroughfare != null) {
                thoroughfare = thoroughfare.ThoroughfareName;
            }
            if (postalCode != null) {
                postalCode = postalCode.PostalCodeNumber;
            }
        }
    }
    var source = AdfPage.PAGE.findComponent("d1");
    AdfCustomEvent.queue(source, "submitInfoToServer", 
    {
        selected_point : response.name, result_point:result_point , address : address, country : countryNameCode, area : adminAreaName, locality : localityName, thoroughfare : thoroughfare, postalCode : postalCode, accuracy : accuracy
    },
false);
}

Create the GoogleMapViewerForm (the backing bean of google_map.jspx)

Create a new class GoogleMapViewerForm and add a "googleMapViewer" managed bean with backingBean scope in google-map-viewer-task-flow.
package blogspot.soadev.view.backing;

import java.util.Map;
import javax.faces.context.FacesContext;
import oracle.adf.view.rich.context.AdfFacesContext;
import oracle.adf.view.rich.render.ClientEvent;
import org.apache.myfaces.trinidad.render.ExtendedRenderKitService;
import org.apache.myfaces.trinidad.util.Service;

/**@author pino
 */
public class GoogleMapViewerForm {

    public void loadGoogleMap(ClientEvent clientEvent){
        FacesContext context = FacesContext.getCurrentInstance();
        Map<String, Object> pageFlowScope = AdfFacesContext.getCurrentInstance().getPageFlowScope();
        Object obj = null;
        String address = null;
        String countryCode = null;
        Double latitude = null;
        Double longitude = null;
        
        address = (String)pageFlowScope.get("address");
        countryCode = (String) pageFlowScope.get("countryCode");
        obj = pageFlowScope.get("latitude");
        if (obj != null && obj instanceof Double){
            latitude = (Double)obj;
        }
        obj = pageFlowScope.get("longitude");
        if (obj != null && obj instanceof Double){
            longitude = (Double)obj;
        }
        //build javascript
        StringBuilder script = new StringBuilder();
        script
            .append("initializeMap(")
            .append("'mapPH',")
            .append(latitude)
            .append(",")
            .append(longitude)
            .append(",'")
            .append(address)
            .append("','")
            .append(countryCode)
            .append("');");
       
        ExtendedRenderKitService erks = 
            Service.getService(context.getRenderKit(), ExtendedRenderKitService.class);
          erks.addScript(context, script.toString());
    }

   public void setReturnValues(ClientEvent event) {
        Map<String, Object> pageFlowScope =AdfFacesContext.getCurrentInstance().getPageFlowScope();
        Map<String, Object> eventParams = event.getParameters();
        Object selectedCoordinates = eventParams.get("selected_point");
        if (selectedCoordinates != null){
            String coordinates[] = ((String)selectedCoordinates).split(",");
            Double latitude = Double.parseDouble(coordinates[0]);
            Double longitude = Double.parseDouble(coordinates[1]);
            pageFlowScope.put("returnLatitude", latitude);
            pageFlowScope.put("returnLongitude", longitude);
        }
        pageFlowScope.put("returnAddress", eventParams.get("address"));
        pageFlowScope.put("returnDetails", eventParams);
    }
}

Integrate the google-map-viewer-task-flow as a task-flow-call activity into your existing task flows

Steps to integrate the Google Map viewer into your application:
  1. Open your existing task flow in diagram view and drag a task-flow-call activity from the component pallete.
  2. Drag the google-map-viewer-task-flow from the project explorer into the task-flow-call activity created above.
  3. Add a control-flow-case and extend it from one of your page that has address information to our google-map-viewer-task-flow activity.
  4. Add a button on your page that will have an
A picture paints a thousand words. Please see screen shot below:
Screen shot of the sample page that invokes the map viewer:
The action listener is bound to the class SamplePageForm declared as "samplePage" managed bean with backingBean scope. Below is the illustrative code:
package soadev.blogspot.view.backing;

import java.util.Iterator;
import java.util.Map;
import javax.faces.event.ActionEvent;
import oracle.adf.view.rich.context.AdfFacesContext;
import org.apache.myfaces.trinidad.event.ReturnEvent;

public class SamplePageForm {
    public void setMapInputParams(ActionEvent event) {
        Map pageFlowScope = AdfFacesContext.getCurrentInstance().getPageFlowScope();
        //You will get the information to put to the pageFlowScope below
        //from your iterator binding objects. 
        //sample inputs only, replace Jeddah
        pageFlowScope.put("address", "Jeddah");
        //replace null with your own data;
        pageFlowScope.put("latitude", null);
        pageFlowScope.put("longitude", null);
        pageFlowScope.put("countryCode", null);
        
    }

    public void handleMapDialogReturn(ReturnEvent event) {
        System.out.println("handling dialog return...");
        Map eventReturnParams = event.getReturnParameters();
        Iterator iterator = eventReturnParams.entrySet().iterator();
        while (iterator.hasNext()) {
            Map.Entry entry = (Map.Entry)iterator.next();
            Object key = entry.getKey();
            Object value = entry.getValue();
            System.out.println(key + " ..... " + value);
        }
        Object obj = null;
        Double latitude = null;
        Double longitude = null;
        obj = eventReturnParams.get("latitude");
        if (obj != null && obj instanceof Double) {
            latitude = (Double)obj;
        }
        obj = eventReturnParams.get("longitude");
        if (obj != null && obj instanceof Double) {
            longitude = (Double)obj;
        }
        if (latitude != null && longitude != null) {
            //TODO create popup confirmation to apply new selected coordinates
            //showDialog(popup);
        }
    }
}
Below is a sample result of the handleMapDialogReturn() method above:
handling dialog return...
returnDetails ..... {postalCode=null, area=null, address=7901 Hail, Jeddah 23325, Saudi Arabia, locality=null, thoroughfare=null, selected_point=21.540356,39.160337, accuracy=8.0, country=SA, result_point={of=21.5404074, y=21.5404074, x=39.1601585, $a=39.1601585}}
returnLatitude ..... 21.540356
returnAddress ..... 7901 Hail, Jeddah 23325, Saudi Arabia
returnLongitude ..... 39.160337

Summary

This blogpost illustrate the following "How Tos":
  • How to integrate the Google Maps API to an Oracle ADF application.
  • How to run a backing bean code upon page load.
  • How to pass parameters from the server to the client and vice-versa.
  • How to do geocoding and reverse geocoding in Google Maps.
  • How to apply Frank Nimphius declarative lightweight popup pattern.

Related Posts

This post is long one (and it sure made me exhausted). I hope that you learn something from here.

Cheers!